Complete User
Everything you need to know about the LifeQ enabled vívosmart© HR and the tools that work with it
- GETTING STARTED
- MANAGE YOUR ACCOUNT
- vívosmart HR
- LIFEQ SCREEN
- DEVICE INFORMATION
- LIFEQ USER PORTAL
- LIFEQ EXCHANGE APP
GETTING STARTED
Power device ON/OFF
Power ON the LifeQ enabled vívosmart© HR by pressing the device key briefly
- The GARMIN logo will appear on the screen, followed by the Time&Date screen (this may take a few seconds)
Power OFF the vívosmart HR by holding in the device key until the 'Power Off' message appears on the screen. Tap the message to power off
- Powering off the device may take a few seconds
Step 1: Create a LifeQ ID
In a CHROME browser, go to the User Portal URL specified for your pilot (i.e. pilot.userportal.lifeq.com/register/
-
Register a new account by selecting ‘LET’S GET STARTED’
-
Enter a valid email address, name, surname and create a strong password
-
Create your user profile:
Check the box to confirm that you will be linking a Garmin vívosmart HR to your LifeQ profile
Set your units of measure, Date of Birth, Gender, Height and Weight
The final setup screen shows the default values for Body Fat Percentage, VO2max, Resting Heart Rate and Maximum Heart Rate. These values are calculated from your gender, height, weight and age. If you have more accurate information than the default values indicated here, please update the relevant fields by unchecking the default box and changing the indicated value. If you are not sure what the values should be, leave these fields on the default setting
Please Note: It is very important to enter the correct user information in order to maximize the accuracy of the LifeQ outputs
Step 2: Install LifeQ Exchange
-
Once logged into the User Portal, open the LifeQ menu in the top left corner of the screen and select 'LifeQ Exchange App'
-
Select the relevant installer for your operating system
-
Run the installer and follow the instructions to install the LifeQ Exchange App on your computer
-
The LifeQ Exchange App window will open automatically once the application is successfully installed
-
Log in using the same credentials used to access the LifeQ User Portal
Please note: Installs are only available for Windows PC or Mac
Step 3: Link Device
In order to link your user profile to the device:
-
Ensure that the LifeQ Exchange App is running on your computer
-
Power ON the vívosmart HR
-
Wait for the Garmin logo to disappear from the device screen
-
Connect the USB charging cable into a USB port on your computer
-
Align the charger posts with the contacts on the back of the device, and press the charger (1) until it clicks into place
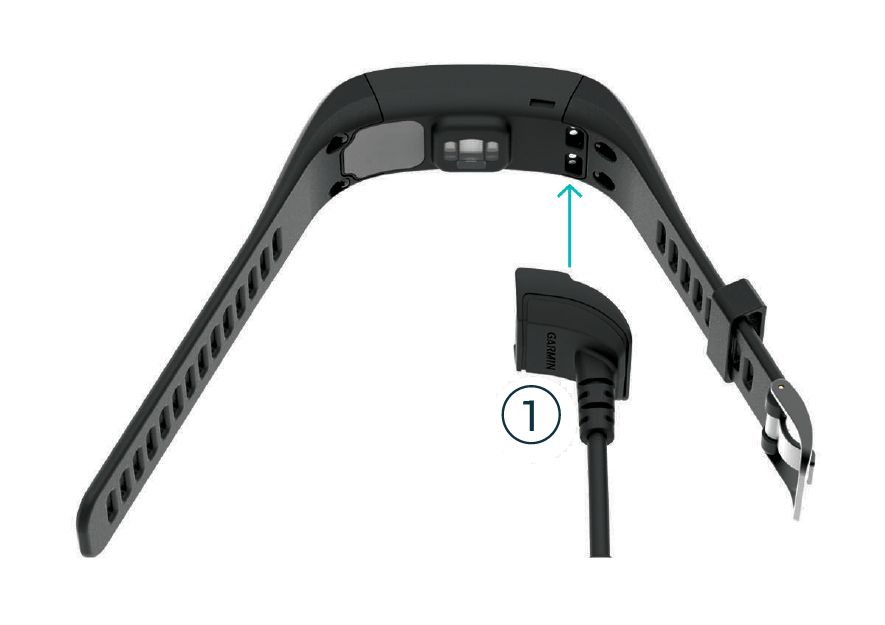
You will be prompted by the LifeQ Exchange App to link your profile to the device
Ensure that your device is sufficiently charged before disconnecting it from your computer
Please note: There is no need to safely eject the device prior to disconnecting
Step 4: Device Placement
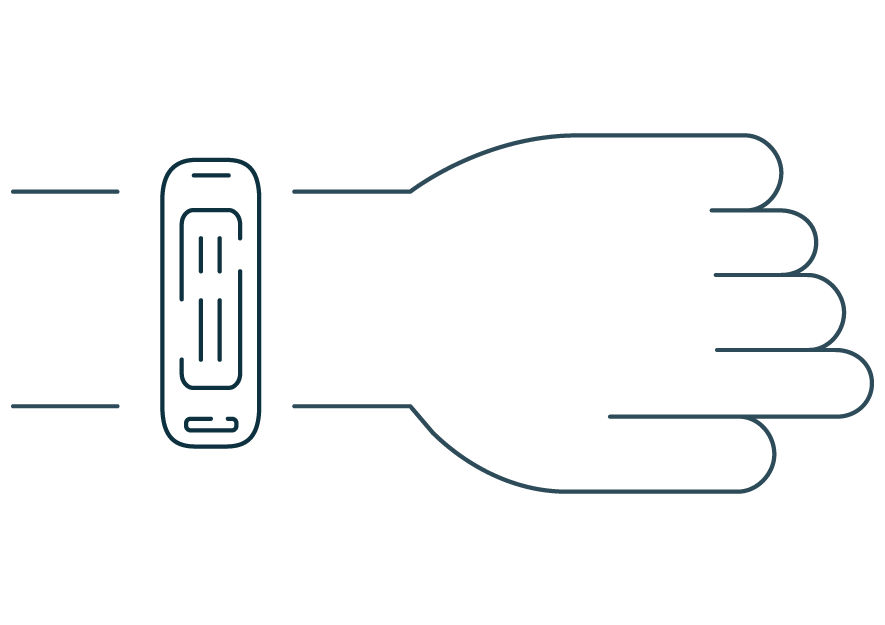
The vívosmart HR should be worn on your non-dominant wrist, positioned just above the wrist bone.
Ensure that the strap is tight enough so that the device does not shift around, but it does not need to be uncomfortably tight.
Please see vívosmart HR > Device Screens & Features for more information on the user feedback mechanism designed to assist in ensuring that the device is worn correctly
Step 5: Start Monitoring
Please note: You will only be able to initiate the heart rate (HR) monitor AFTER you have registered and created a valid user profile on the User Portal, as well as linked the device to your User Profile via the LifeQ Exchange App. An invalid user profile will keep the device in a non-operable state.
-
While the device is powered on, place the device on your wrist
-
The HR monitor will automatically turn on when the device detects skin contact
-
Continue with your daily activities
Step 6: Stop monitoring
The heart rate monitor will automatically turn off when the device is removed from your wrist
Step 7: Data Upload
-
Ensure that the device is powered on
-
Open the LifeQ Exchange App on your computer
-
Connect the device via the USB charging cable
-
The Exchange App will automatically download the data files from the device and upload them to the LifeQ cloud. The data will subsequently be cleared from your device
-
A pop-up notification will appear once the data has been uploaded successfully
-
Disconnect your device from the USB charging cable and reposition it on your wrist to restart monitoring
Please note: If the internet connection is unstable, uploads will be re-attempted once a stable internet connection is established
Step 8: Visualize your Data
Various tools are available through which you can visualize your data. If you are unsure of the specific tool for accessing your data, please contact your Pilot Coordinator for further instructions.
- Via Your Report accessed on the LifeQ User Portal:
Go to pilot.userportal.lifeq.com/report/body
- Via Third Party Applications:
Please contact your Pilot Coordinator for further details
MANAGE YOUR ACCOUNT
Update Your User Profile
Updating your user profile can be performed via the LifeQ Exchange App or directly within the LifeQ User Portal:
LifeQ Exchange App
-
Open the LifeQ Exchange App as a window
-
Select the drop down arrow in the top right corner of the window
-
Select Update Profile. You will be directed to the LifeQ User Portal
-
If you are not already logged into the User Portal, please log in to continue
LifeQ User Portal
-
Login to the User Portal and open the LifeQ menu in the top left corner of the screen
-
Select Your Profile
-
Update the necessary fields
-
Select Save
Alternatively, go directly to pilot.userportal.lifeq.com/profile
VERY IMPORTANT! Once you have updated your user profile, reconnect your device to the LifeQ Exchange App in order to link your updated profile to the device
Change your Password
-
Log into the LifeQ User Portal
-
Open the menu in the top left corner of the screen and select ‘Your Profile’
-
Select Your Account
-
Create a new password and select Save
OR go directly to your account via pilot.userportal.lifeq.com/account
Reset your Password
If you have forgotten your password while logged out of the User Portal:
-
Open the LifeQ menu in the top left corner of the LifeQ User Portal
-
Select Login
-
Enter your email address and select OKAY
-
Select Forgot Password? on the password screen
An email containing a link to reset your password will be sent to the email address that you used when registering on the LifeQ User Portal
Please Note: This link is only valid for 24 hours
vívosmart HR
Device Screens & Features
Time and Date:
Displays the current time and date as well as the day of the week. The time and date will sync automatically when connected to the LifeQ Exchange App
Steps
Displays the total number of steps taken for the day. Steps are reset every day and are cleared at midnight
Calories
Displays your energy expenditure for the day, measured in calories.
Resources
Displays the available battery (Battery Level) and storage (Storage Free) on the vívosmart HR
Device Information
Displays the current firmware running on the device (FW:Vx.x.xx) as well as the device ID number for technical support purposes
LifeQ HR
Displays your continuous, real-time heart rate as well as your current signal quality.
Continuous heart rate (HR) is the real-time detection of an individual’s heart rate. The accuracy of the extracted HR is directly affected by the quality of the signal received through a person's skin. Thus, continuous HR includes a user feedback mechanism (known as the confidence metric), to indicate the confidence of the HR measurement. The confidence metric is expressed on a scale from 0-100:
Poor signal: <20, considered a 'low confidence'. The HR measurement is likely to be within 10bpm of the actual HR 50% of the time
Good signal: 20-40, considered a 'medium confidence'. The HR measurement is likely to be within 5bpm 70% of the time
Great signal: >40, considered a 'high confidence'. The HR measurement is likely to be within 5bpm 90% of the time
The heart rate confidence metric is an indicator of suboptimal positioning and/or mechanical fit of the vívosmart HR as well as low perfusion (low blood flow to the capillary bed). To improve your signal quality, adjust or reposition the device on your wrist. Some other messages that may be observed on the LifeQ HR screen include:
No Signal: indicates that the device is not able to detect contact with skin and is not monitoring
Motion Check: The device senses motion and is in the process of initiating a Skin Check
Skin Check: the device is checking for skin detection HR Calib: the device has detected skin contact and is busy calibrating
LIFEQ SCREEN
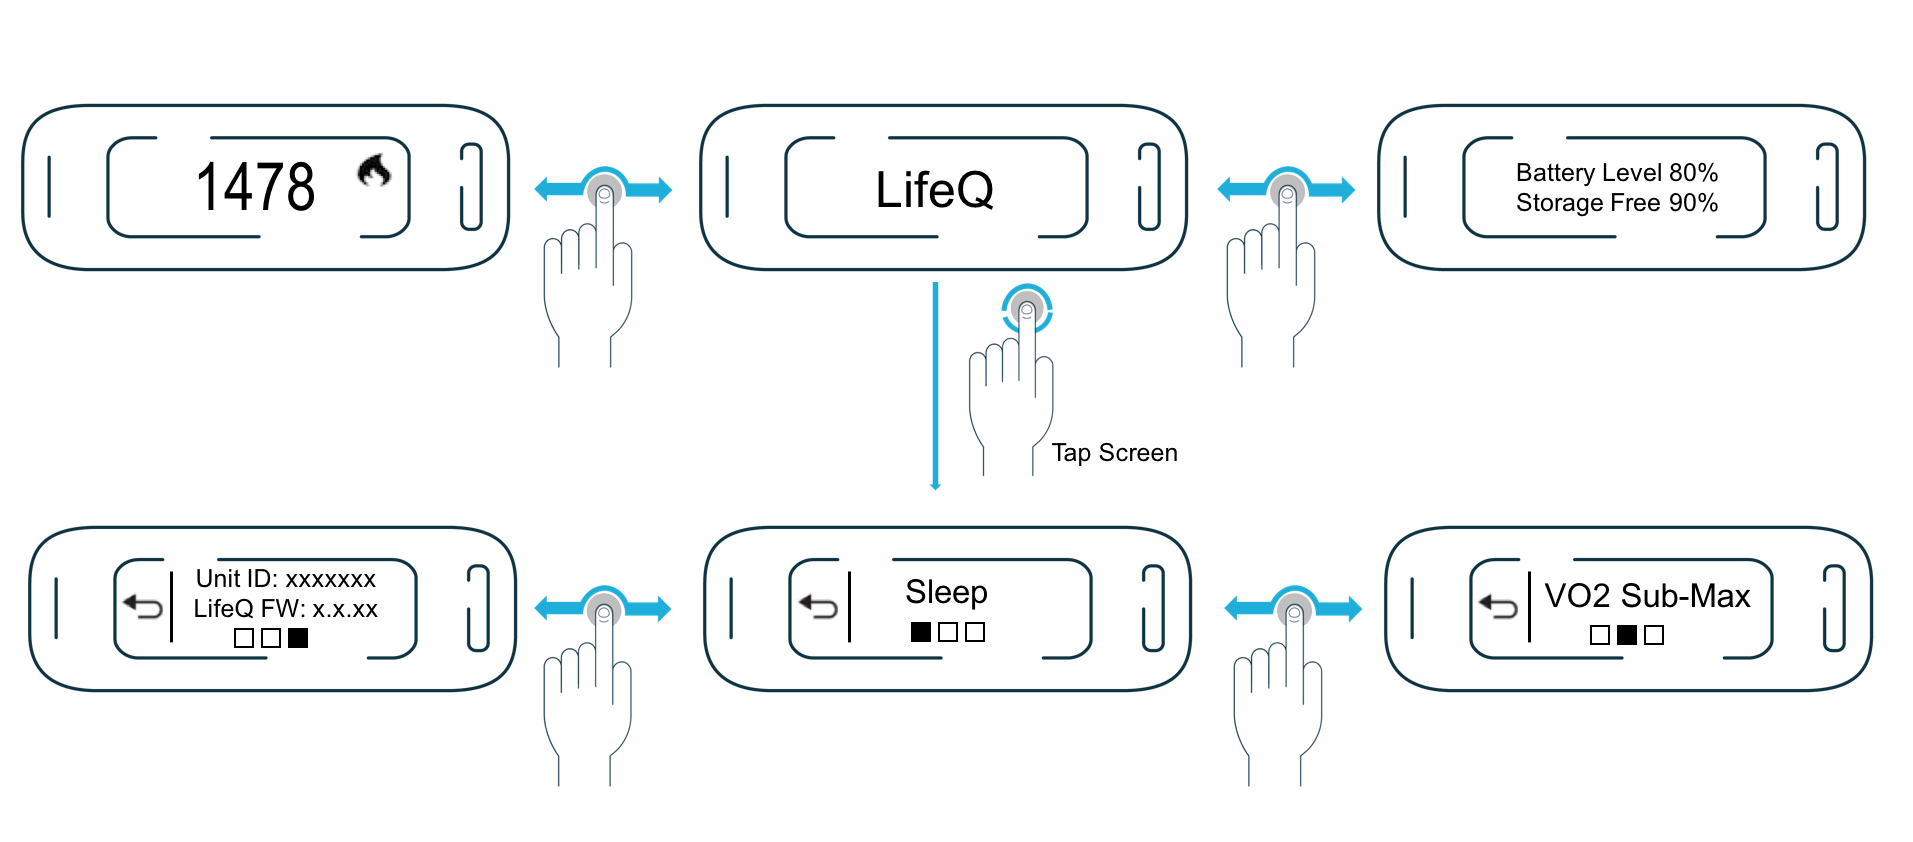
Follow the instructions below in order to access Sleep Annotation & the LifeQ submaximal exertion VO2 max test:
Sleep Annotation
The Sleep Annotation feature will aid in LifeQ’s research and understanding of sleep and its effect on health and wellness.
By using the Sleep Annotation feature, your device will be set to sleeping mode. This allows you to collect additional contextual sleep annotation data such as the time it takes you to fall asleep, your sleep efficiency as well as keeping track of naps.
We are working hard to make the LifeQ User Portal compatible with this new feature. Until then, the new sleep metrics will not be accessible from the User Portal. We hope that this does not discourage you from using the feature.
Please note:
This feature should only be activated when you are intending to go to sleep (i.e. when your lights are off and ready to close your eyes).
Ensuring that your device has at least 25% battery before going to bed will assist in the collection of important contextual sleep information throughout the night.
Going to Sleep:
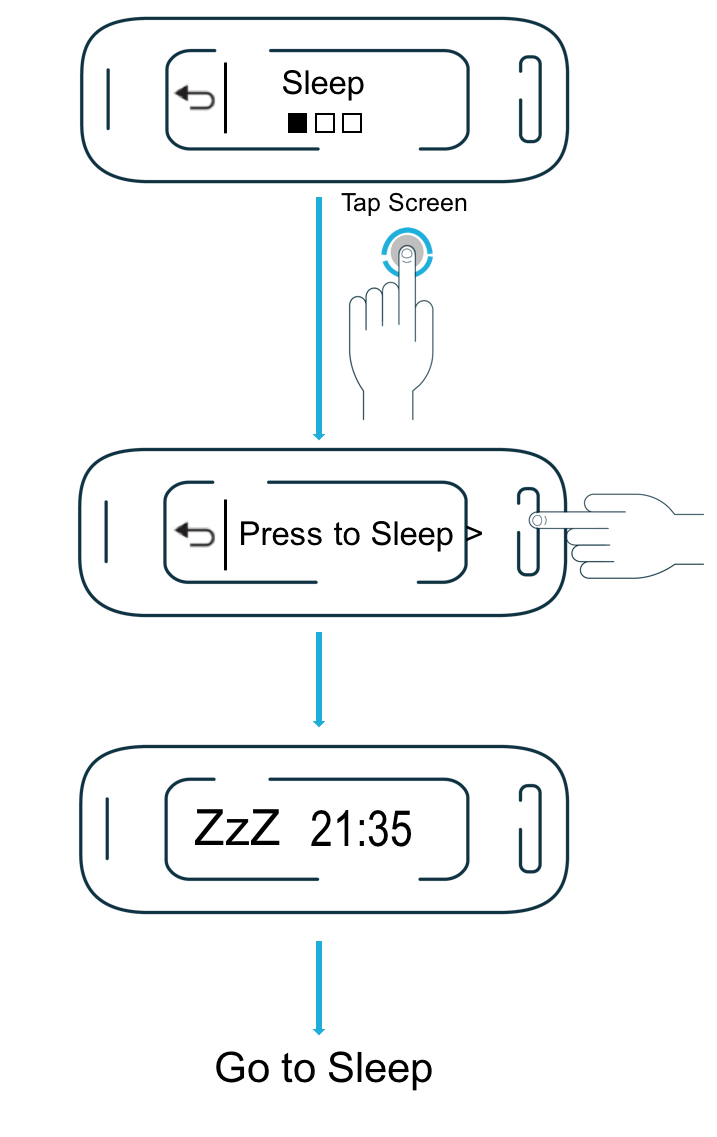
- When you are ready to close your eyes and go to sleep, scroll to the LifeQ screen on your device.
- Tap the LifeQ screen to access the Sleep screen.
- Tap the Sleep screen, and then press the device button briefly to start.
- The device will vibrate once to let you know that the Sleep feature has been activated.
- Go to sleep.
Waking up:
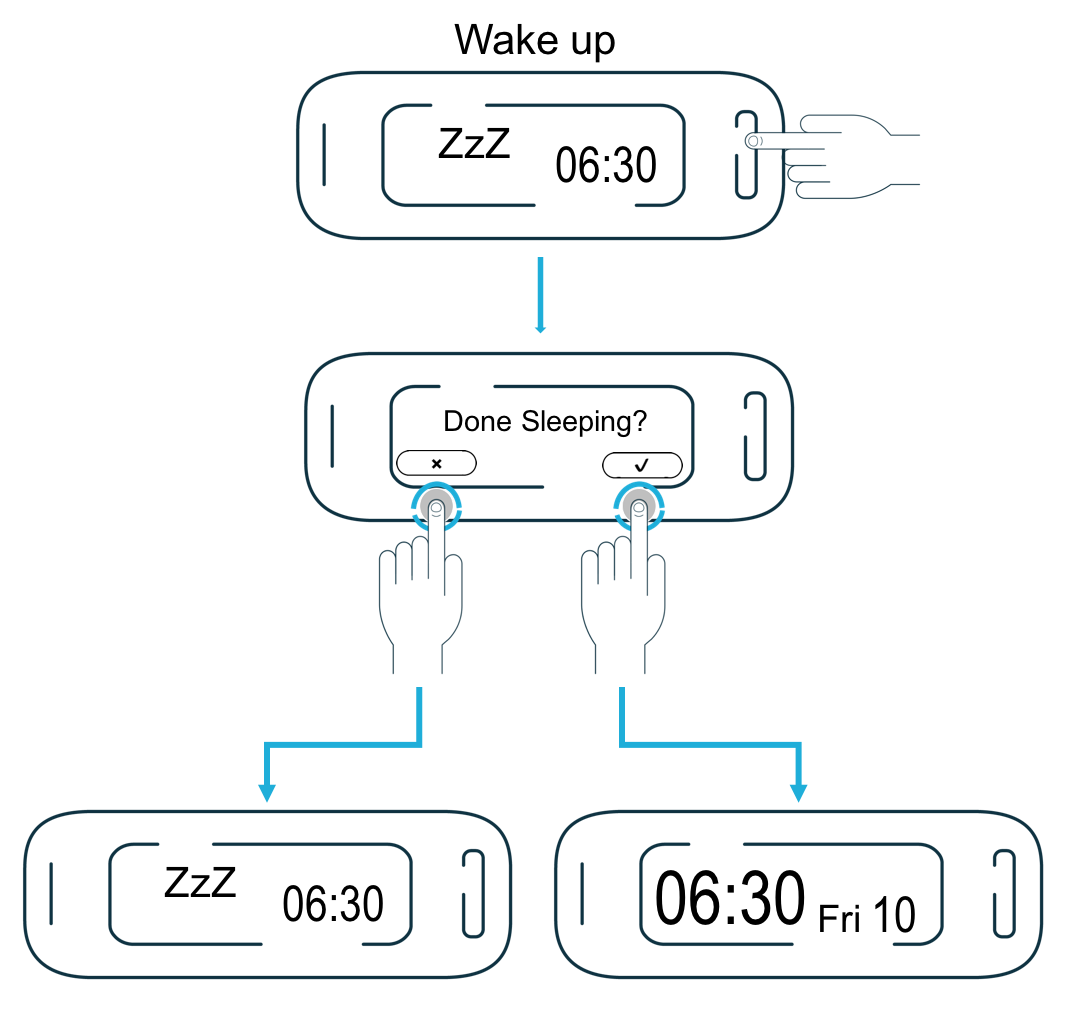
- When you are ready to wake up, press the device button once briefly.
- Select the ✔️ on the Done Sleeping? screen if you are ready to wake up. The device will vibrate, and you will be redirected to the Date/Time screen.
Snoozing:
Please only deactivate the Sleep Annotation feature once you are done sleeping.
LifeQ submaximal exertion VO2 max test (VO2 Sub-Max)
VO2 max is the most commonly used measure for assessing cardiorespiratory fitness. LifeQ’s VO2 Sub-Max test is an adaptation of the gold standard test for VO2 max, which requires you to run at maximal exertion. Instead of having to perform a highly intensive laboratory-based test that demands this type of physical exertion, the LifeQ VO2 Sub-Max test only requires that you to run on a treadmill at a comfortable speed for a few minutes.
The LifeQ VO2 Sub-Max test has been designed to provide you with a VO2 max score that will allow you to assess your cardiorespiratory fitness level by comparing your score to typical VO2 max scores of individuals in your age and gender group.
Please Note: It is important that you have access to a treadmill for a minimum of 10 minutes in order to successfully complete this test. We recommend that you do not attempt the test after physical exercise or stressful encounters. Please wait at least 30 minutes after consumption of stimulants (like tea or coffee), and do not perform the test more than 3 times in a row.
How to perform the VO2 Sub-Max test:
Match the numbers in the image to the steps in the instructions below
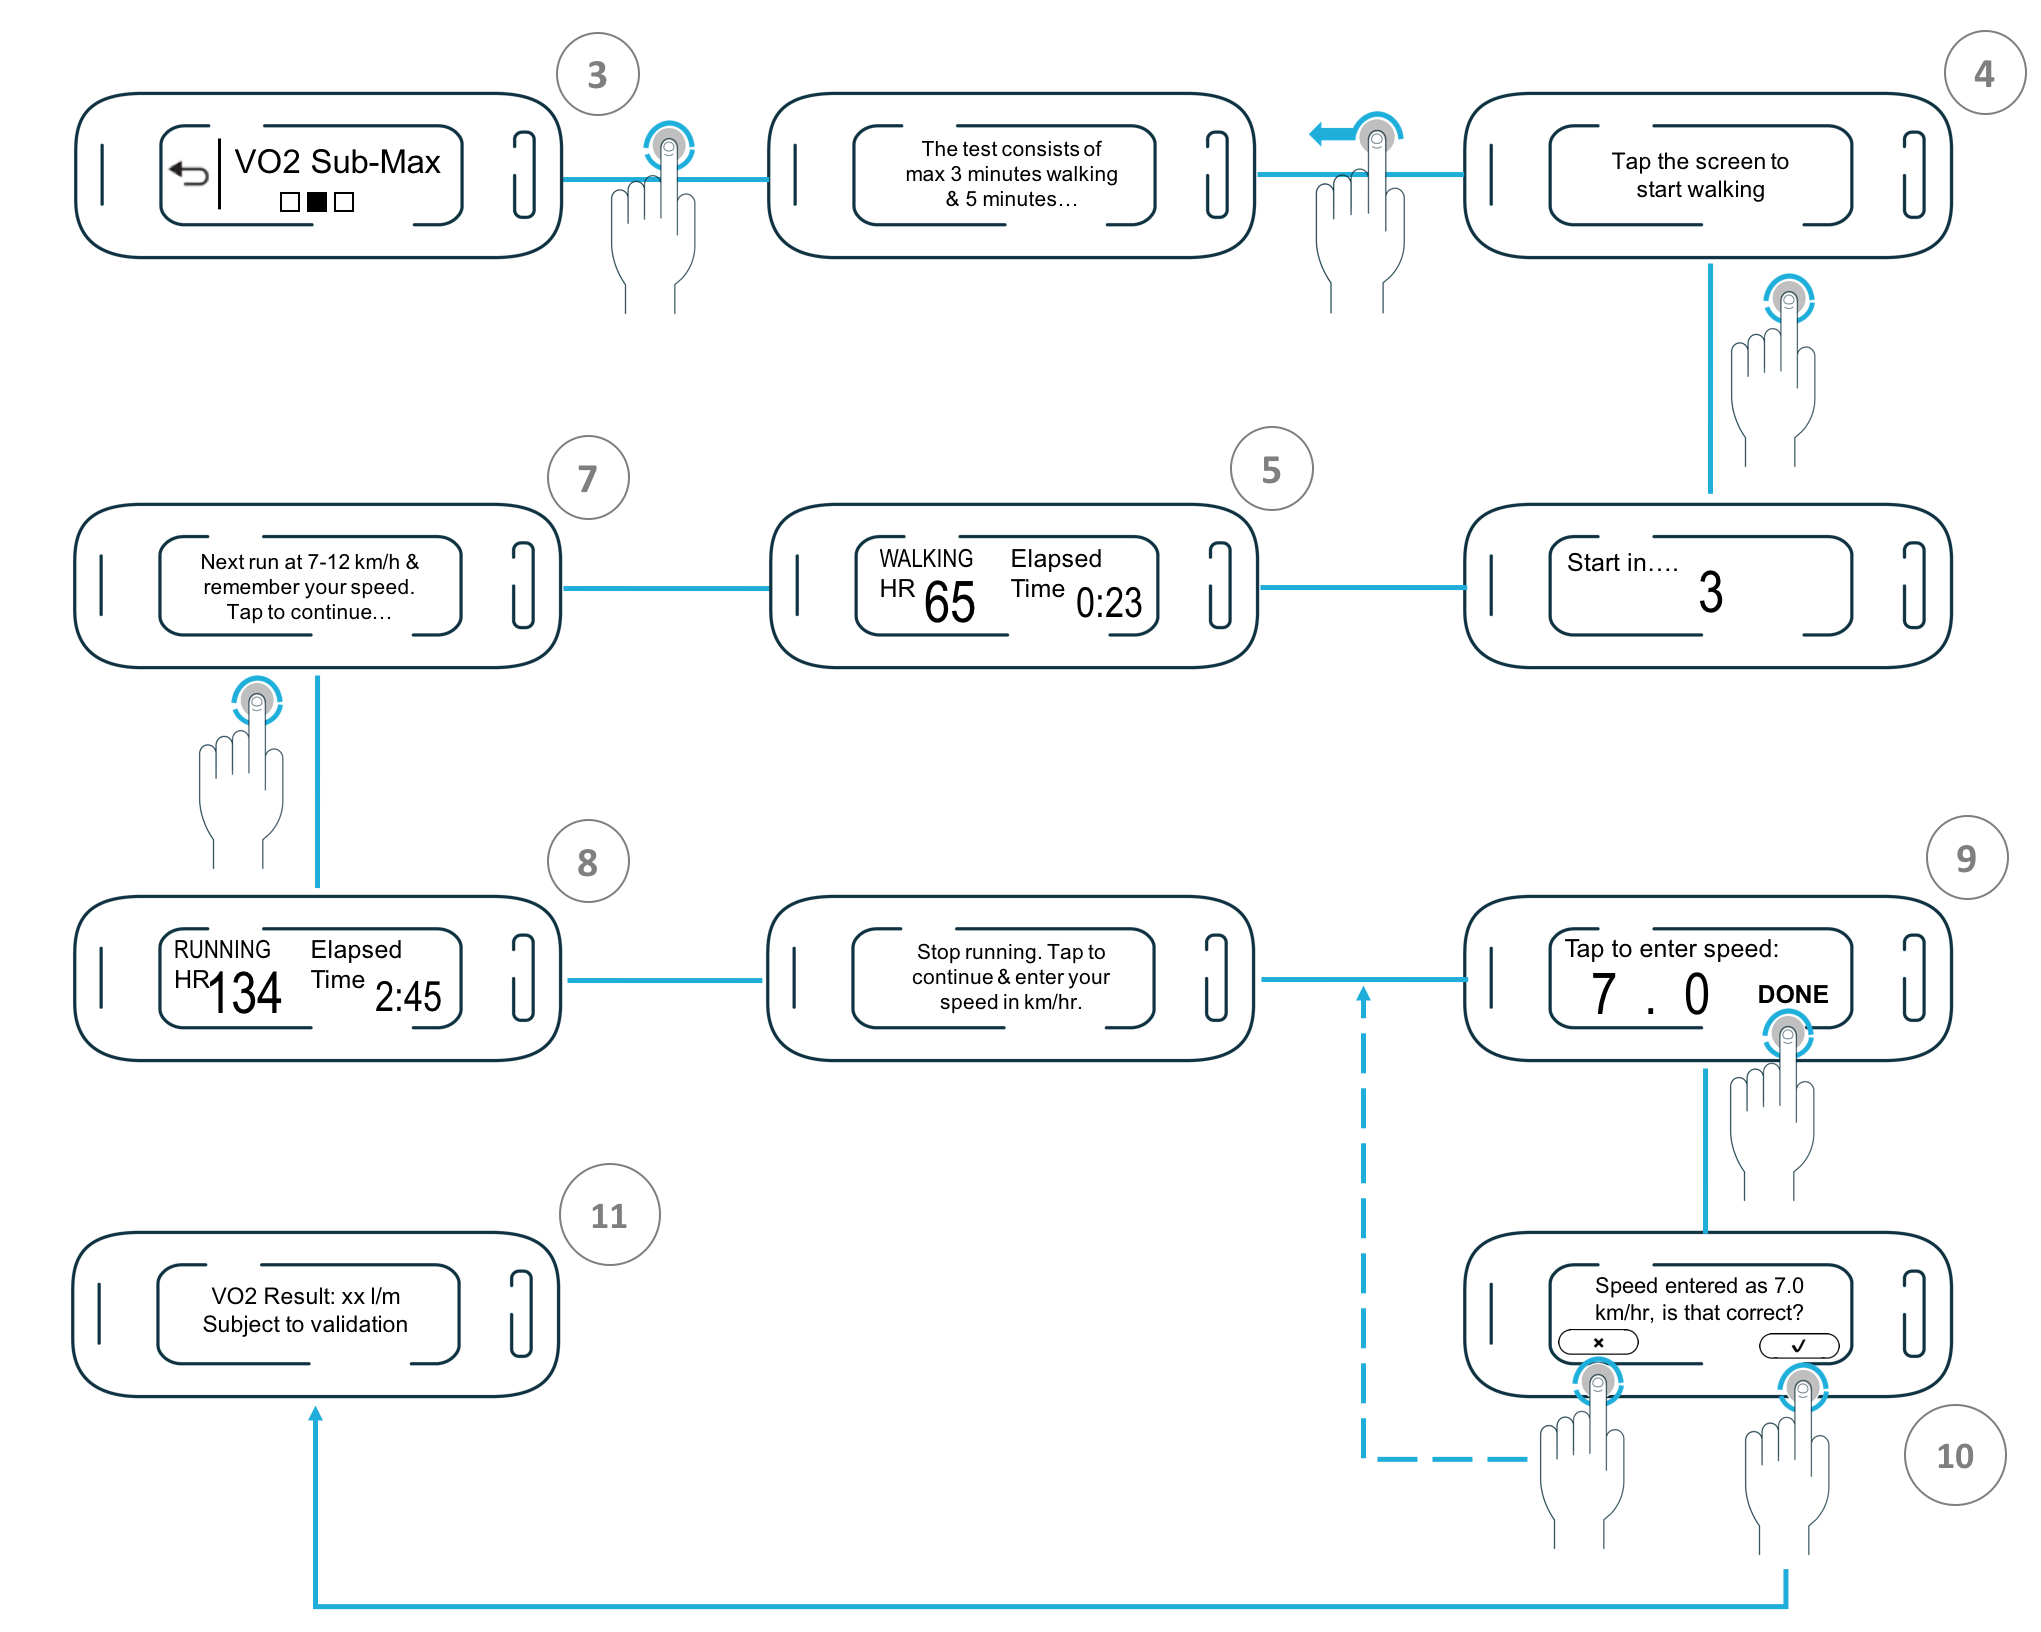
- While standing on the treadmill scroll to the LifeQ screen on your device and press the device button once briefly.
- Swipe left on the **Sleep** screen to access the **VO2 Sub-Max** screen.
- Tap the **VO2 Sub-Max** screen and swipe left between the information screens to read the full test instructions.
- Tap the final information screen to initiate the test.
- After the countdown, please start walking at a comfortable pace (recommended speed: 5km/h).
- The device will vibrate once the walking phase is complete.
- Set your treadmill to any speed between 7 & 12 km/h, and as it speeds up tap the screen to continue to the jogging phase. You should feel comfortable jogging at the selected pace for an extended amount of time (10min+), and your heart rate should remain below 180 bpm. Please reduce speed if necessary.
- Once your Heart Rate has stabilised sufficiently for the VO2 Sub-Max score to be calculated, the device will vibrate indicating the end of the running phase and you may stop the treadmill1.
- Enter your selected running speed by tapping on the numbers to change the values. Once you have selected the correct speed, tap **DONE** in order to proceed to the next screen.
- Please confirm that the speed entered is correct by tapping the TICK ( ✔️ ).
- Your absolute VO2 max score will now be displayed in L/min. This result will be saved to your account on the LifeQ cloud, however it will not automatically update your profile on the LifeQ User Portal.
1 If your Heart Rate does not sufficiently stabilise within 5 minutes after commencing the jogging phase, the test will time-out without attempting to calculate your VO2 max score. In this case the device will vibrate and display the message “Test Fail: No Stable HR” on the screen. You may re-attempt the test up to 3 times in a row, however, since every attempt has an impact on your physiological state it is important that you allow your heart rate to return to resting conditions before repeating the test.
To cancel the test:
If at any stage you would like to cancel the test, simply press the device button to access the Cancel Test screen, and select the TICK ( ✔️). Alternatively select the CROSS (✖️ ) if you no longer wish to cancel the test.
If the test fails:
If for some reason the test fails, the device will vibrate and display the reason that the test failed (i.e. Test Fail: Off-Skin / No Stable HR). Simply tap the screen to go back to the VO2 Sub-Max screen where you can either restart or exit the test.
DEVICE INFORMATION
Memory Capacity Approx. 48 hours Battery Life Approx. 24 hours Recharge Time 0-100% charge, approx. 75 minutes Battery Type Rechargeable, built-in lithium-ion battery Water Rating Swim, 5ATM* The device withstands pressure equivalent to a depth of 50m Device Updates
Firmware updates for the vívosmart HR will occur automatically through the LifeQ Exchange App. Once the update is complete, your profile will be relinked to the device and you will be able to continue monitoring with the new, improved firmware running on your device.
Charging your Device
-
Connect the USB charging cable to a USB port on your computer
-
Align the charger posts with the contacts on the back of the device, and press the charger (1) until it clicks into place

The device will take approximately 75 minutes to charge fully from 0% battery WARNING: This device contains a lithium-ion battery.
Please note: To prevent corrosion, thoroughly clean and dry the contacts and the surrounding area before charging or connecting to a computer
Device care
-
Avoid extreme shock and harsh treatment, this can degrade the life of the product
-
Avoid pressing the keys under water
-
Do not use sharp objects to clean the device
-
Never use use a hard or sharp object to operate the touchscreen, this may result damage.
-
Avoid chemical cleaners, solvents, and insect repellents that can damage plastic components and finishes
-
Thoroughly rinse the device with fresh water after exposure to chlorine, salt water, sunscreen, cosmetics, alcohol, or other harsh chemicals. Prolonged exposure to these substances can damage the devices’ plastic components and finishes
-
Do not store the device where prolonged exposure to extreme temperatures can occur.
-
Do not remove the bands of the device
Cleaning the device
Even small amounts of sweat or moisture can cause corrosion of the electrical contacts when connected to a charger. Corrosion can prevent the device from charging and performing data transfer properly. Please clean the device regularly as follows:
-
Rinse your device with water
-
Wipe it dry
-
After cleaning, allow the device to dry completely before connecting to your USB cable
LIFEQ USER PORTAL
The web-based LifeQ User Portal is a platform on which users can perform basic management tasks including registration, creating and editing a user profile, password management as well as downloading the LifeQ Exchange App. Detailed self-help material available on the LifeQ Help page can also be accessed via the LifeQ User Portal
Register a new account
Follow the steps in Getting Started > Step 1 to create a LifeQ ID for first time registration
Getting to know the LifeQ User Portal
After registering a LifeQ ID and creating your user profile, you will gain access to a number of pages from the drop down LifeQ menu located in the top left corner of the screen:
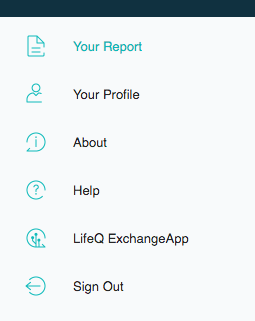 • Your Report: Data visualization tool
• Your Profile: Manage your user profile and password
• About page: Observe the latest product versions available
• Help page: LifeQ Support knowledgebase
• LifeQ Exchange App: Provides a link to download the LifeQ Exchange App
• Sign Out / Sign In: Sign out of OR Sign into the LifeQ User Portal
Your Report
Your Report provides a detailed visualization of the data that has been collected using your vívosmart HR.
Please refer to Your Report Explained for further information on the data that is available to view.
Your Profile
Biometrics
A large part in ensuring that the data collected using your vívosmart HR is as accurate as possible is by keeping your user profile updated. Updating your user profile can be performed on the Your Report tab on the User Portal. Please refer to Update Your User Profile for more information
VERY IMPORTANT! Once you have updated your user profile, reconnect your device to the LifeQ Exchange App in order to link the updated profile to your device
Account
View the email address with which you have registered a LifeQ ID or change your login password. Please see Change your Password for more information
Please note: Your password must consist of at least 8 characters, including 1 uppercase letter and 1 number
About
Observe the latest product versions available for your system
Help
Detailed self-help material on the vívosmart HR and LifeQ system is available on the LifeQ Help page:
Getting Started
• Access an online version of the Quick Start Guide
• Learn how to keep your LifeQ tools up to date
• Find information about the battery and memory capacity of your device, as well as the vívosmart HR Water Rating
• Access this Complete User Guide
Your Report Explained
• Explanation of the various measures and metrics that can be viewed on Your Report
Manage your account
• Updating your user profile
• Changing and resetting your LifeQ password
• Managing your 3rd Party permissions
Fix A Problem
• View the most frequently asked questions about the vívosmart HR and LifeQ tools
• View basic troubleshooting tips to assist in identifying and fixing common issues
Report an Issue
• Provides details on how to contact the LifeQ Support team regarding any queries or issues experienced
Exchange App
Download the latest version of the LifeQ Exchange App for your Windows PC or Mac
Please refer to LifeQ Exchange App below for more information
LIFEQ EXCHANGE APP
The LifeQ Exchange App is a desktop application through which all communication with your vívosmart HR occurs. The LifeQ Exchange App is used to link your user profile to the device, upload data collected from the device to the LifeQ cloud as well as remotely perform device firmware updates.
Install the LifeQ Exchange App
-
Once your user profile has been created on the LifeQ User Portal, open the LifeQ menu in the top left corner of your screen and select LifeQ Exchange App
-
Select the relevant installer for your computer (only available for Mac and Windows PC)
-
The download will be initiated
-
Once the LifeQ Exchange App has downloaded and installed on your computer, login using your LifeQ User Portal login details
Locate the LifeQ Exchange App shortcut icon
While the LifeQ Exchange App is running in the background of your computer, a shortcut icon is provided for easy access to the application. Selecting this icon provides access to the LifeQ Exchange App menu, allowing you to open the application in a new window on your desktop. This icon can be located as follows:
Mac:
The LifeQ Exchange App icon can be located in the toolbar in the top right corner of your screen
Windows:
The LifeQ Exchange App icon can be located in the Services taskbar in the bottom right corner of your screen. Select the arrow to show hidden icons.
Upload data
-
Ensure that the vívosmart HR is powered on
-
Open the LifeQ Exchange App on your computer
-
Connect the device via the USB charging cable provided
-
A pop-up notification will appear stating that the device is syncing. Please do not disconnect your device until prompted to do so
-
The data upload will initiate automatically. The data will first be downloaded from the device to the LifeQ Exchange App after which it will be uploaded to the LifeQ cloud. The upload progress will be displayed at the bottom of the Exchange App window
-
A pop-up notification will appear once the data upload has been completed successfully
-
Disconnect your device from the charger and reposition it on your wrist to restart monitoring
-
To disable automatic data uploads, select Pause future uploads in the drop down menu in the top right corner of the window. This will allow you to prevent data uploads when you have minimal access to data or when your internet connection is not stable. You can later resume the data upload by selecting Resume Uploads
Menu Features
Selecting the dropdown menu in the top right corner of the LifeQ Exchange App window will provide access to the following features:
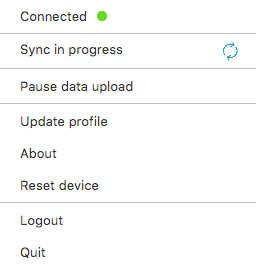 • Connected / Disconnected: The connection status of your vívosmart HR
• Sync in Progress: The upload status of your vívosmart HR
• Pause Data Upload: Disable automatic data uploads
• Update profile: Provides a link to the LifeQ User Portal to update your user profile
• About: View Exchange App details and upload logs for technical support
• Reset device: Reset your vívosmart HR to unlink your user profile
• Logout: Log out and close the Exchange App window
• Quit: Quit the Exchange App